一、创建组件
右键点击ofbiz根目录下的build.xml——Run as(运行方式)——Ant构建(第二个)——在“选择要执行的目标”的框中——取消start——找到create component打钩——点击运行——在出现的输入框中都输入组建的名字learning——最后一步选择Y——完成——刷新左边的资源管理视图——hot-deploy下出现learning组件目录
二、初始部署
1、修改learning/ofbiz-component.xml文件中的webapp标签:
1
2
3
4
5
6
7
| <webapp name="learning"
title="learning"
server="default-server"
location="webapp/learning"
base-permission="OFBTOOLS"
mount-point="/learning"
app-bar-display="true"/>
|
base-permission代表登陆权限,app-bar-display=”true”表示该应用会在后台应用主菜单中出现。
2、初次体验。
启动ofbiz,浏览器进入后台目录管理界面,点击左上角的应用菜单,再点击learning,进入应用主页面。如果页面中显示“不允许你浏览这个页面。”,不必担心,这只是你未做任何添加前的自动生成页面。
3、创建controller。
在learning/webapp/learning/WEB-INF/controller.xml中,添加一个请求映射:
1
2
3
4
| <request-map uri="FindProductPlan">
<security https="true" auth="true" />
<response name="success" type="view" value="FindProductPlan" />
</request-map>
|
根据请求映射,再添加一个响应的view视图映射:
1
| <view-map name="FindProductPlan" type="screen" page="component://learning/widget/learningScreens.xml#FindProductPlan"/>
|
4、创建视图。
在learning/widget/learningScreens.xml中,添加一个name=FindProductPlan的screen视图装饰器:
1
2
3
4
5
6
7
8
9
10
11
12
13
14
15
16
17
18
19
20
21
22
23
24
25
26
27
28
29
30
| <screen name="FindProductPlan">
<section>
<actions>
<set field="headerItem" value="ProductPlan"/>
</actions>
<widgets>
<decorator-screen name="main-decorator" location="${parameters.mainDecoratorLocation}">
<decorator-section name="body">
<section>
<widgets>
<decorator-screen name="FindScreenDecorator" location="component://common/widget/CommonScreens.xml">
<decorator-section name="menu-bar">
<container style="button-bar">
<link target="EditProductPlan" text="新建" style="buttontext create"/>
</container>
</decorator-section>
<decorator-section name="search-options">
<include-form name="FindProductPlan" location="component://learning/widget/learningForms.xml"/>
</decorator-section>
<decorator-section name="search-results">
<include-form name="ListProductPlan" location="component://learning/widget/learningForms.xml"/>
</decorator-section>
</decorator-screen>
</widgets>
</section>
</decorator-section>
</decorator-screen>
</widgets>
</section>
</screen>
|
关于ofbiz装饰器的配置规则,请参考Apache+OFBiz+开发初学者指南.chm(关于此份文档如何获取,请浏览本文结尾)。而在该装饰器中,外围嵌套了名为main-decorator(在CommonScreens.xml中)的主装饰器,负责页面的主体装饰。内层嵌套了名为FindScreenDecorator的装饰器,该装饰器主要分为两部分:search-options(搜索选项)和search-results(搜索结果)。在这两部分中分别布置一个搜索表单和列表表单。
5、创建表单。
在learning/widget/learningForms.xml中,添加name= FindProductPlan和name=ListProductPlan的表单:
1
2
3
4
5
6
7
8
9
10
11
12
13
14
15
16
17
18
19
20
21
22
23
24
25
26
27
28
29
30
31
32
33
34
35
36
37
38
39
| <form name="FindProductPlan" type="single" target="FindProductPlan" title="" default-map-name="ProductPlan"
header-row-style="header-row" default-table-style="basic-table">
<field name="productPlanId" title=""><text-find/></field>
<field name="itemId"><text-find/></field>
<field name="principleId"><text-find/></field>
<field name="submitButton" title="${uiLabelMap.CommonFind}">
<submit button-type="button"/>
</field>
</form>
<form name="ListProductPlan" type="list" list-name="listIt"
paginate-target="FindProductPlan" default-entity-name="ProductPlan"
odd-row-style="alternate-row" default-table-style="basic-table hover-bar">
<actions>
<set field="noConditionFind" value="Y"/>
<service service-name="performFind" result-map="result" result-map-list="listIt">
<field-map field-name="inputFields" from-field="parameters"/>
<field-map field-name="entityName" value="ProductPlan"/>
</service>
</actions>
<field name="productPlanId" widget-style="buttontext" title="生产计划编号">
<hyperlink description="${productPlanId}" target="ViewProductPlan">
<parameter param-name="productPlanId"/>
</hyperlink>
</field>
<field name="itemId" title="项目编号"><display/></field>
<field name="principleId" title="负责人编号"><display/></field>
<field name="useProject" title="应用工程"><display/></field>
<field name="startTime" title="开始日期"><display type="date"/></field>
<field name="finishTime" title="结束日期"><display type="date"/></field>
<field name="createdStamp" title="创建时间"><display/></field>
<field name="deleteLink" title=" " widget-style="buttontext">
<hyperlink target="RemoveProductPlan" description="${uiLabelMap.CommonDelete}" also-hidden="false">
<parameter param-name="productPlanId"/>
</hyperlink>
</field>
</form>
|
关于表单的配置规则一样可以参考上述那个文档。同时,也要注意几个关键点:target属性相当于一个请求,当表单进行提交的时候,会定向到该请求上,如:
- target=”FindProductPlan”对应请求转到learning/control/FindProductPlan;
- <hyperlink>标签相当于一个超链接;
- 在ListProductPlan表单的<actions>预处理动作中,调用了ofbiz自带的查找服务performFind,使用该功能时- 定要指明entity实体引擎即数据表的名字,同时使用该功能的<form>必须是type=”list”,且list-name必须是listIt(因为performFind服务返回的就是一个name=listIt列表);
- 第二个表单中的几个target使用了,现在还未定义的请求映射,可以置之不理或删除即可。
6、创建菜单。
在learning/widget/learningMenus.xml文件的名为MainAppBar<menu>标签中,添加:
1
| <menu-item name="ProductPlan" title="生产计划"><link target="FindProductPlan"/></menu-item>
|
三、部署实体
1、在learning/entitydef/entitymodel.xml中,添加entity实体(即数据库表):
1
2
3
4
5
6
7
8
9
10
11
12
13
14
15
16
17
18
19
20
21
22
23
24
25
26
27
28
29
30
31
32
33
34
35
36
37
38
39
40
41
42
43
44
45
46
47
48
49
50
51
52
53
54
55
56
57
58
59
60
61
62
63
64
65
66
67
68
69
70
71
72
73
74
75
76
77
78
79
80
81
82
83
84
85
86
87
| <entity entity-name="ProductPlan" package-name="">
<field name="productPlanId" type="id"/>
<field name="itemId" type="id"/>
<field name="startTime" type="date-time"/>
<field name="finishTime" type="date-time"/>
<field name="principleId" type="id-vlong"></field>
<field name="division" type="long-varchar"></field>
<field name="useProject" type="description"></field>
<field name="stageIdenf" type="description"></field>
<field name="tecnoDemand" type="description"></field>
<field name="preparationId" type="id-vlong"></field>
<field name="designDemand" type="id-vlong"></field>
<field name="product" type="id-vlong"></field>
<field name="outCheck" type="id-vlong"></field>
<field name="documentPrepa" type="id-vlong"></field>
<field name="armyCheck" type="id-vlong"></field>
<field name="outJudge" type="id-vlong"></field>
<field name="sureCompile" type="short-varchar"></field>
<field name="sureJudge" type="short-varchar"></field>
<field name="sureApprove" type="short-varchar"></field>
<field name="date" type="date-time"></field>
<field name="departmentId" type="id"></field>
<prim-key field="productPlanId"/>
<relation type="one" fk-name="ProductPlan_Item" rel-entity-name="ProductPlanItem">
<key-map field-name="itemId" rel-field-name="id"/>
</relation>
<relation type="one" fk-name="ProductPlan_Person" rel-entity-name="ProductPlanPerson">
<key-map field-name="principleId" rel-field-name="id"/>
</relation>
<relation type="one" fk-name="ProductPlan_Pre" rel-entity-name="ProductPlanPreparation">
<key-map field-name="preparationId" rel-field-name="id"/>
</relation>
</entity>
<entity entity-name="ProductPlanItem" package-name="">
<field name="id" type="id"/>
<field name="name" type="name"/>
<field name="category" type="description"/>
<field name="secretLevel" type="description"/>
<field name="source" type="description"/>
<field name="content" type="description"/>
<prim-key field="id"/>
</entity>
<entity entity-name="ProductPlanPerson" package-name="">
<field name="id" type="id"/>
<field name="name" type="name"/>
<field name="department" type="name"></field>
<field name="phone" type="tel-number"/>
<field name="address" type="description"/>
<prim-key field="id"/>
</entity>
<entity entity-name="ProductPlanPlan" package-name="">
<field name="id" type="id"/>
<field name="content" type="description"/>
<field name="startTime" type="date-time"/>
<field name="finishTime" type="date-time"/>
<field name="department" type="name"/>
<field name="principleId" type="id"/>
<prim-key field="id"/>
<relation type="one" fk-name="Product_Plan_Person" rel-entity-name="ProductPlanPerson">
<key-map field-name="principleId" rel-field-name="id"/>
</relation>
</entity>
<entity entity-name="ProductPlanPreparation" package-name="">
<field name="id" type="id"/>
<field name="category" type="description"/>
<field name="materialName" type="name"/>
<field name="applyFinishTime" type="date-time"/>
<field name="applyPrincipleId" type="id"/>
<field name="processFinishTime" type="date-time"/>
<field name="processPrincipleId" type="id"/>
<field name="inCheckFinishTime" type="date-time"/>
<field name="inCheckPrincipleId" type="id"/>
<prim-key field="id"/>
<relation type="one" fk-name="Product_Pre_Person1" rel-entity-name="ProductPlanPerson">
<key-map field-name="applyPrincipleId" rel-field-name="id"/>
</relation>
<relation type="one" fk-name="Product_Pre_Person2" rel-entity-name="ProductPlanPerson">
<key-map field-name="processPrincipleId" rel-field-name="id"/>
</relation>
<relation type="one" fk-name="Product_Pre_Person3" rel-entity-name="ProductPlanPerson">
<key-map field-name="inCheckPrincipleId" rel-field-name="id"/>
</relation>
</entity>
|
实体配置规则同样参照上述文档,此处不再复述。
2、利用相应的操作mysql数据库工具,对ProductPlan数据表新增一些数据。
四、小有成就
启动ofbiz,进入learning应用,点击菜单中的生产计划,即可看到FindProductPlan界面:

在搜索选项中输入数据项,点击查找,便可出现相应的搜索结果,查找功能暂且完成。但这仅仅是个小小的成果,还有View展示详细数据、Create新建数据、Remove删除数据、Edit修改数据等功能需要我们去实现。路漫漫其修远兮,吾将上下而求索···
五、实现View功能
1、由于ProductPlan数据表有很多字段,所以我们需要一个ViewProductPlan页面显示某一个数据项的详细信息。展现一个页面的基本步骤,可以参照本文第三部分:
- 配置control.xml文件,将请求映射到视图,再由视图映射到具体的装饰器(screen);
- 在装饰器xml配置文件中,通过该装饰器对视图进行布置,同时还要调用表单;
- 在表单xml配置文件中,完成被调用表单的配置。
(PS:如果数据库表字段不多,仅通过上述FindProductPlan界面就能完全显示,那可以不需要View功能。)
2、代码如下:
(1)control.xml:
1
2
3
4
5
6
| <request-map uri="ViewProductPlan">
<security https="true" auth="true" />
<response name="success" type="view" value="ViewProductPlan" />
</request-map>
<view-map name="ViewProductPlan" type="screen" page="component://learning/widget/learningScreens.xml#ViewProductPlan"/>
|
(2)learningScreens.xml:
1
2
3
4
5
6
7
8
9
10
11
12
13
14
15
16
17
18
19
20
21
22
| <screen name="ViewProductPlan">
<section>
<actions>
<set field="ProductPlanId" from-field="parameters.ProductPlanId"/>
<entity-one entity-name="ProductPlan" value-field="ProductPlan"/>
</actions>
<widgets>
<decorator-screen name="CommonRoutingDecorator" location="component://manufacturing/widget/manufacturing/RoutingScreens.xml">
<decorator-section name="body">
<screenlet title="生产计划表">
<container style="button-bar">
<link target="FindProductPlan" text="返回" style="buttontext"/>
</container>
<include-form name="ViewProductPlan" location="component://learning/widget/learningForms.xml"></include-form>
</screenlet>
</decorator-section>
</decorator-screen>
</widgets>
</section>
</screen>
|
表单的actions预处理动作,保证了显示表单中的数据项是传进来的ProductPlanId的数据项(虽然笔者也不知为何?)。
(3)learningForms.xml:
1
2
3
4
5
6
7
8
9
10
11
12
13
14
15
16
17
18
19
20
21
22
23
24
25
| <form name="ViewProductPlan" type="single" target="EditProductPlan" title="" default-map-name="ProductPlan">
<field name="productPlanId" tooltip="" title="" position="1"><text/></field>
<field name="itemId" position="2"><lookup target-form-name="LookupProductPlanItem" size="16"/></field>
<field name="startTime" position="1"><text type="date"/></field>
<field name="finishTime" position="2"><text type="date"/></field>
<field name="principleId"><lookup target-form-name="LookupProductPlanPerson" size="16"/></field>
<field name="division" position="2"><text/></field>
<field name="useProject"><text/></field>
<field name="stageIdenf" position="2"><text/></field>
<field name="tecnoDemand"><text/></field>
<field name="preparationId" position="2"><lookup target-form-name="LookupProductPlanPreparation" size="16"/></field>
<field name="designDemand"><text/></field>
<field name="product" position="2"><text/></field>
<field name="outCheck"><text/></field>
<field name="documentPrepa" position="2"><text/></field>
<field name="armyCheck"><text/></field>
<field name="outJudge" position="2"><text/></field>
<field name="sureCompile"><text/></field>
<field name="sureJudge" position="2"><text/></field>
<field name="sureApprove"><text/></field>
<field name="departmentId" position="2"><text/></field>
<field name="submitButton" title="修改">
<submit button-type="button"/>
</field>
</form>
|
在该表中,有几个要点:
<field>的属性position=”2”是表示该数据项的左右位置(默认是1),但相邻的数据项之间不能都等于2(此处玄学,笔者不甚了解);<text type="date">表示该数据项只显示日期;<lookup target-form-name="LookupProductPlanItem" size="16"/>是数据项的一种可以提供便捷查找功能的格式,其属性target对应一个请求(control/LookupProductPlanItem),说明我们还要创建一个请求以及响应视图才能使用这个功能。
(4)创建Lookup请求,在controller.xml中添加:
1
2
3
4
5
6
| <request-map uri="LookupProductPlanItem">
<security https="true" auth="true" />
<response name="success" type="view" value="LookupProductPlanItem" />
</request-map>
<view-map name="LookupProductPlanItem" type="screen" page="component://learning/widget/LearningScreens.xml#LookupProductPlanItem"/>
|
(5)创建Lookup视图,在LearningScreens.xml中添加:
1
2
3
4
5
6
7
8
9
10
11
12
13
14
15
16
17
18
19
20
21
22
23
24
| <screen name="LookupProductPlanItem">
<section>
<condition>
<if-service-permission service-name="catalogPermissionCheck" main-action="VIEW"/>
</condition>
<actions>
<set field="title" value="查找项目"/>
<set field="queryString" from-field="result.queryString"/>
<set field="entityName" value="ProductPlanItem"/>
<set field="searchFields" value="[id, name, category, secretLevel]"/>
</actions>
<widgets>
<decorator-screen name="LookupDecorator" location="component://common/widget/CommonScreens.xml">
<decorator-section name="search-options">
<include-form name="FindProductPlanItem" location="component://learning/widget/LearningForms.xml"/>
</decorator-section>
<decorator-section name="search-results">
<include-form name="ListProductPlanItem" location="component://learning/widget/LearningForms.xml"/>
</decorator-section>
</decorator-screen>
</widgets>
</section>
</screen>
|
<actions>中的第三个<set>标签是指定具体数据库表;第四个是用来,在调用该Lookup功能的数据项旁,显示value中字段数据的。
(6)创建Form表单,在LearningForms.xml中添加:
1
2
3
4
5
6
7
8
9
10
11
12
13
14
15
16
17
18
19
20
21
22
23
24
25
26
27
28
29
30
31
| <form name="FindProductPlanItem" type="single" target="LookupProductPlanItem" title="" default-map-name="ProductPlanItem"
header-row-style="header-row" default-table-style="basic-table">
<field name="id" title=""><text-find/></field>
<field name="name"><text-find/></field>
<field name="category"><text-find/></field>
<field name="submitButton" title="${uiLabelMap.CommonFind}">
<submit button-type="button"/>
</field>
</form>
<form name="ListProductPlanItem" type="list" list-name="listIt"
paginate-target="LookupProductPlanItem" default-entity-name="ProductPlanItem"
odd-row-style="alternate-row">
<actions>
<set field="noConditionFind" value="Y"/>
<service service-name="performFind" result-map="result" result-map-list="listIt">
<field-map field-name="inputFields" from-field="parameters"/>
<field-map field-name="entityName" value="ProductPlanItem"/>
</service>
</actions>
<field name="id" widget-style="smallSubmit">
<hyperlink also-hidden="false" target-type="plain" description="${id}" target="javascript:set_value('${id}')"/>
</field>
<field name="name"><display/></field>
<field name="category"><display/></field>
<field name="secretLevel"><display/></field>
<field name="source"><display/></field>
<field name="content"><display/></field>
</form>
|
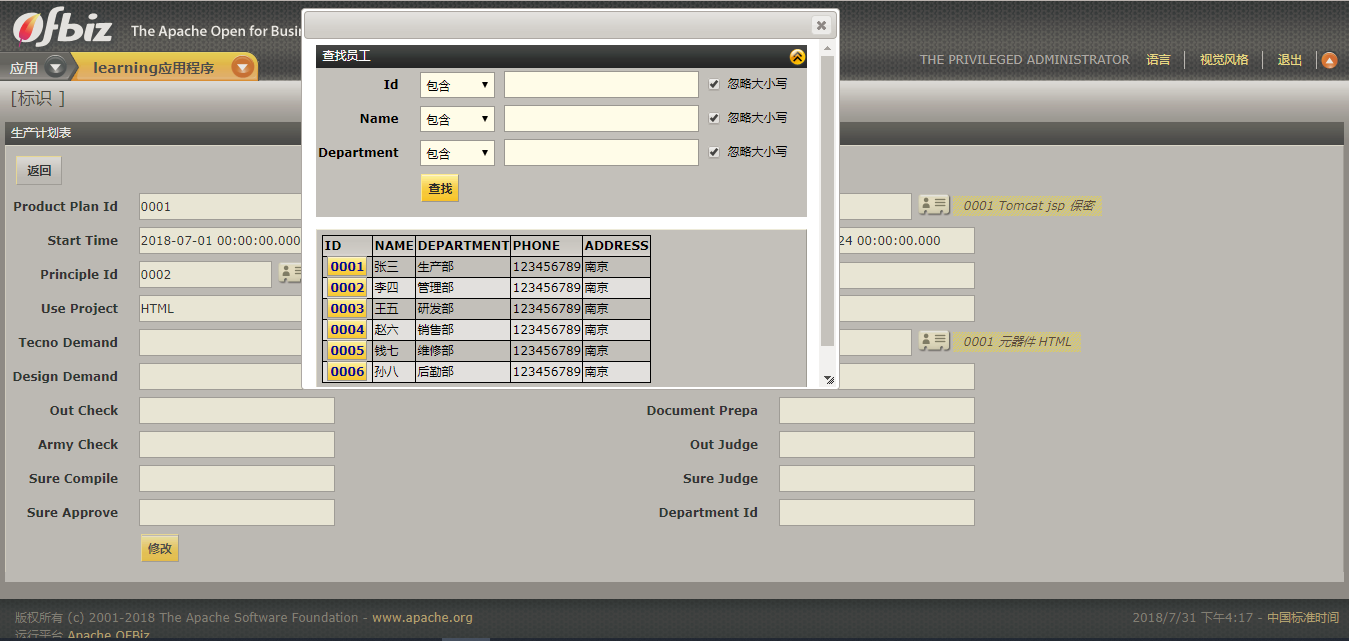
(7)完工的ViewProductPlan视图
结语(本文结束的几个月后所添加的)
此处推荐一位ofbiz大神博客:上海香飘飘,博客中不仅有关于ofbiz的知识,有很多资源链接,读者可以下载阅读。其中就包括入门级指南Apache+OFBiz+开发初学者指南[Ob4.0-EN+Ob9.0-CN].chm。这份指南很全,若能认真反复阅读,必能获益匪浅。